Sunday, September 26, 2010

CF3 Coffee Chat - Friedman Residence Tour

With summer in full sweltering session, CF3's August coffee chat took us to Amberley Village, a local suburb of Cincinnati loaded with great Mid Century Moderns. The Friedman Residence is a very modest house cared for with meticulous maintenance by its current owners. The home is also slated to be featured in an upcoming issue of Atomic Ranch magazine.


The house has a typical low pitched roof from street side, yet the roof partially zig zags to butterfly along the back of the house. Similar to our house, one walks into the compressed area only to have a nice release of space of the main living and dining areas. The large expanse of glass across the back of the house emphasizes the open space.


Inside the living space, it's obvious why Atomic Ranch is featuring the house, the original details are immaculate. A large brick fireplace anchors the large open area complemented by a recessed bullet light and Nelson Pear lamps beyond. The layout of the furniture is precise and cohesive, providing a very functional and open space.


A photo of the aforementioned fireplace up close. The roman brick wall and hearth are accented with different masonry patterns and limestone banding to create an asymmetrical composition. A built-in planter has been converted to a bench on one side and a Frank Lloyd Wright designed Sprite on the other.


A couple of super sweet freestanding Danish lights are at one end of the living / dining area. Newer cork floors keep it crisp.


I wish I had taken some photos of the original bathrooms, but I did grab a couple of the ultra 50's kitchen, almost perfectly in tact. The upper cabinets are outwardly profile with linear frosted glass doors are backlit. Underneath, Boomerang Formica counters are edged in stainless and cap base metal cabinets complete with the recessed door profile. It's not often to see these cabinets, let alone in such a great intact setup.


These cabinets deck out the entire kitchen. In this photo you can barely see the Nutone exhaust fan on the ceiling at the top of the photo, at the bottom a glimpse of the retro stove. Be sure to look for some more photos of the house in an upcoming issue of Atomic Ranch magazine.

Sunday, September 19, 2010

Thrift Store Score -Teak Bird

We recently scored this little teak bird at a local thrift store among a couple of other smaller items. Sometimes it pays to look beyond the furniture and scavenge through the racks of smaller items. After we had the bird for awhile I felt he looked a little lonely, so my daughter and I glued together a bunch of leftover redwood shavings and created a little modern nest for the bird. The designer/maker of the bird is unknown, the bottom is marked "From Bob, 1955". Drop me a line if you might know more.

Wednesday, September 15, 2010

Flat Roof Replacement - Days 8 & 9 (The End Is Near)

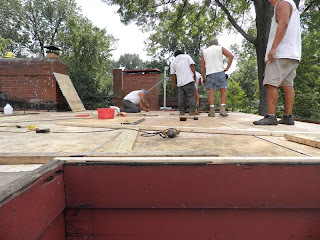
We're feeling pretty good around our MCM flat roof abode. We are officially dry, no roof leaks, and thus can proceed on interior work we have ever so patiently been waiting to get moving along. The process and timeline of our roof replacement project has mandated this patience so we can do it right. This first photo shows the original red colored fascia in its entirety, color change is good.


Digging into this area revealed our time capsule from a year ago, the previous patchjob repair we did when we initially discovered roof leaks. The newer plywood from the patch job was already saturated. Some roof joists were previously replaced around the chimney along with a couple of the 2x purlins.


At the corner of the roof a close up shot of the existing wood deterioration found during the existing roof removal. The 1x material around the outside is our redwood fascia. Not much was keeping water from getting behind it.


At the chimney a close up of the new framing and a small wrap around that the roof does at the chimney. While it looks cool from the ground this roof detail has suffered a lot of water passing through to the chimney below and the interior of our future studio space. Problem solved.


The last of the new plywood installation is almost complete in this photo. No more wet substrate is left on the house. Milestones are good at this point, I'll be observing many of them.


Later, the tapered insulation is going down. This area is the most complex in terms of crickets and drainage. As Day 8 neared an end, all that was left for this day was to throw a sheet of rubber over this area and figure the rest of the tapered out on Day 9.


That evening I was able to walk around the roof with no roofers staring me down. At this point all my photography is not exactly smiled upon. Of course this is of no detriment to bring to you the process of replacing our entire flat roof. Nonetheless this photo is great in showing the huge mess of materials, etc, just piled about. The temporary rubber overnight install can be seen to the lower right weighted down by buckets of adhesive.


The roof only has four downspouts to drain the entire roof. The roofers custom fabricated new stainless steel 'boots'. One of which is in my hand to the left. This boot is mechanically fastened to the framing with the rubber adhered to the wide pan, and the downspout to where my hand is holding it. In our case these boots drain through the roof to the downspouts. We had issues with our old boots leaking onto the soffit at one drain.


Day 9 I was able to only catch the end of the day. The tapered was figured out, origami training must be a prerequisite to install tapered insulation. Here the roofers are getting prepared to lay down a large sheet of EPDM. The glue is applied to both the rubber membrane and tapered insulation. After air drying the glue when joined forms its bond.


At the valleys of the crickets there is a reinforcement strip installed for additional support to any potential punctures. When the roof was removed several gouges were found from tree branch impacts. The large oak tree next door should be good for awhile since we trimmed it back.


The final rubber installation before us. You can make out the tapered insulation layout in a star shaped pattern. While complex the final result looks quite simple and clean. I'm proud to say the water test in this area showed great drainage with very little puddling.


And yet another milestone, the EDPM rubber installtion is complete as of 9 days of work. The new umbrella is fully extended and ready for storms. To this point 9 working days have been spread out a little over a month. The next steps towards completion involve mostly trimwork and rubber details. We'll take a look at those in the next roof post.

Sunday, September 5, 2010

Mid Century Modern Curb Appeal - Summer Plantings

Since fall is pretty much here as of the low 50's we woke up to this morning, its time to take a look at the landscaping efforts near fruition. Last we looked last Spring, we had started with the bed to the far right of the house, near the new screen wall. In front of the porch, we lost interest in our short lived bulb garden once things were done flowering.


After digging all the bulbs and sorting them for storage and future relocation, Wendy and I choose 7 plants to fill the rectalinear area. Not really knowing what we wanted permanently, we choose mostly annuals to drop a dash of color in front of the dark gray house. The new walkway pads now have fresh soil in between and some initial new grading around them.


In our newest poured planting bed, we got to work immediately after the concrete was cured. This area receives way more sun giving us more options for plants. Our main requisite for all our plantings was vibrant flowering color.


A look at the two landscape beds together. The Impatients do a great job filling in around the gray planter we got from a DWR warehouse sale.


A view of the previously completely plantings filling in nicely. The linear arrangement of the plants helps emphasize the horizontal lines of the house. I can't help but be geometric.


This post is a bit of the time capsule, here the roofing materials had just been delivered and the 'Gene it up' beige roofline is still intact. Regardless, this is a nice overall view of the landscape progress. More grading has since been completed to blend the concrete into the grass. The roof is almost done and we've been installing the remediated fascia boards recently. We'll take a look at those changes shortly.