Flat Roof Replacement - Days 8 & 9 (The End Is Near)
 We're feeling pretty good around our MCM flat roof abode. We are officially dry, no roof leaks, and thus can proceed on interior work we have ever so patiently been waiting to get moving along. The process and timeline of our roof replacement project has mandated this patience so we can do it right. This first photo shows the original red colored fascia in its entirety, color change is good.
 Digging into this area revealed our time capsule from a year ago, the previous patchjob repair we did when we initially discovered roof leaks. The newer plywood from the patch job was already saturated. Some roof joists were previously replaced around the chimney along with a couple of the 2x purlins.
 At the corner of the roof a close up shot of the existing wood deterioration found during the existing roof removal. The 1x material around the outside is our redwood fascia. Not much was keeping water from getting behind it.
 At the chimney a close up of the new framing and a small wrap around that the roof does at the chimney. While it looks cool from the ground this roof detail has suffered a lot of water passing through to the chimney below and the interior of our future studio space. Problem solved.
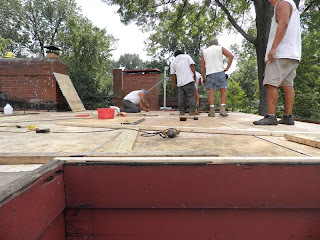 The last of the new plywood installation is almost complete in this photo. No more wet substrate is left on the house. Milestones are good at this point, I'll be observing many of them.
  Later, the tapered insulation is going down. This area is the most complex in terms of crickets and drainage. As Day 8 neared an end, all that was left for this day was to throw a sheet of rubber over this area and figure the rest of the tapered out on Day 9.
 That evening I was able to walk around the roof with no roofers staring me down. At this point all my photography is not exactly smiled upon. Of course this is of no detriment to bring to you the process of replacing our entire flat roof. Nonetheless this photo is great in showing the huge mess of materials, etc, just piled about. The temporary rubber overnight install can be seen to the lower right weighted down by buckets of adhesive.
 The roof only has four downspouts to drain the entire roof. The roofers custom fabricated new stainless steel 'boots'. One of which is in my hand to the left. This boot is mechanically fastened to the framing with the rubber adhered to the wide pan, and the downspout to where my hand is holding it. In our case these boots drain through the roof to the downspouts. We had issues with our old boots leaking onto the soffit at one drain.
  Day 9 I was able to only catch the end of the day. The tapered was figured out, origami training must be a prerequisite to install tapered insulation. Here the roofers are getting prepared to lay down a large sheet of EPDM. The glue is applied to both the rubber membrane and tapered insulation. After air drying the glue when joined forms its bond.
 At the valleys of the crickets there is a reinforcement strip installed for additional support to any potential punctures. When the roof was removed several gouges were found from tree branch impacts. The large oak tree next door should be good for awhile since we trimmed it back.
 The final rubber installation before us. You can make out the tapered insulation layout in a star shaped pattern. While complex the final result looks quite simple and clean. I'm proud to say the water test in this area showed great drainage with very little puddling.
 And yet another milestone, the EDPM rubber installtion is complete as of 9 days of work. The new umbrella is fully extended and ready for storms. To this point 9 working days have been spread out a little over a month. The next steps towards completion involve mostly trimwork and rubber details. We'll take a look at those in the next roof post.
Damn...that was/is quite the project. I think I may want to rethink that butterfly roof that I've been dreaming about.
ReplyDeleteIf you don't mind me asking - what is the approx. cost/sq.ft for a tapered EDPM roof? I am scoping out a similar project for my house. Thanks.
ReplyDeleteJoel, depending on the level of replacement, you can be looking from anywhere from $10 - $20 sf.
ReplyDeleteI hope all the work on the interior is done by now. Your home has gone through quite a lot of renovations, but moving forward in a measured manner helps keep things in perspective and allows you to be very careful with everything you do. When you do that, you better your chances of doing everything right, and in the end, that’s all that matters. I think it also helped that you are an architect and that you know your way around these things quite well. :)
ReplyDelete[Kermit Lukacs]
It's been a while now, and you really had a huge work over there! It's all done in nine days, am I right? That's amazing! Renovations usually take long to finish. How things are going now?
ReplyDeleteSimone @ABImprovements.com